💬 Basic Chat App with Socket.io & MongoDB 💬
Project Setup
-
Have a database setup with a collection called “messages”
-
Clone this repository. In your terminal:
git clone https://github.com/lindskelsey/socket.io-mongodb-tutorial.git
- Open the project in Atom
What we are building
We are building a chat application that takes a user-entered name and message and adds it to MongoDB. The chat window will display both old and new messages
File Structure
Upon opening the project, you should see the following files:
📂 home.html - This is the homepage that will load when you go to http://localhost:3000. This is the first page that a user would see upon opening the app.
In this (and all other html files) we have imported Bootstrap
<link rel="stylesheet" href="https://maxcdn.bootstrapcdn.com/bootstrap/4.0.0-alpha.6/css/bootstrap.min.css" integrity="sha384-rwoIResjU2yc3z8GV/NPeZWAv56rSmLldC3R/AZzGRnGxQQKnKkoFVhFQhNUwEyJ" crossorigin="anonymous">
Bootstrap is a library that allows us to quickly add CSS to an HTML element by giving it a class, rather than writing custom CSS.
In home.html you will see the following HTML:
 <div class="container">
   <div class="row">
     <div class="col-md-6 offset-md-3 col-sm-12">
       <h1 class="text-center">Welcome to my site!</h1>
       <h3 class="text-center"><a href="./chat.html">Enter the chat</a></h3>
     </div>
   </div>
 </div>
Here we are using Bootstrap’s grid system (container, row, offset-md-3) to center our div and also specifying different grid sizes for medium and small screens (col-md-6, col-sm-12).
We won’t be coding in this file– it’s very bare bones, so something you can come back to later to style!
📂 chat.html - This is the page where we will be coding the HTML and client-side JavaScript for our Socket.io chat.
📂 package.json - This is a file that contains metadata associated with a project. You will find the title, description, author, and other information here. This is also the file where your dependencies will be listed once you save them into the project.
Note the code:
"scripts": {
  "start": "node server.js"
}
We can start our project by running node server.js. This script allows us to run npm start in terminal to start the project which executes the command node server.js. Either works, but this is a nice way to make it easy to remember how to run your project!
📂 server.js - This is the file where we will write all of our server-side JavaScript
📂 .gitignore - This is a file where you can list files that you DO NOT want tracked by Git. Sometimes there are files that are unique to your computer that you don’t want to share on GitHub. It’s also common practice to add files with sensitive information like passwords and secret tokens to this list.
📂 README.md, screenshots, _config.yml - README is this document you are looking at right now. Then filename “.md” refers to Markdown– which will let you format text to display nicer on GitHub. Read more Here. The screenshots folder contains all of the images used in this README. _config.yml contains a theme for the README. You can ignore and/or delete all of these.
Instructions
Throughout the project, you will see lots of comments that look like //⭐️ TO-DO 1 ⭐️. Follow the instructions below to complete each TO-DO in the code. Some TO-DO’s will have code for you to paste in, and others will ask you to write your own code.
💻 Okay, let’s code! 💻
⭐️ TO-DO 1 ⭐️ in server.js
First we need to install MongoDB, Socket.io, and Express into our project. First make sure you are in the project, then use the command:
npm install mongodb socket.io express --save
You may see a few warnings when you do this, feel free to ignore those.
Once completed, you will see the following was added to your package.json file:
"dependencies": {
  "express": "^4.16.4",
  "mongodb": "^3.1.13",
  "socket.io": "^2.2.0"
}
Now, if anyone else downloads your project they can just run npm install which will check for this list & automatically download everything on the list. You’ll also see that package-lock.json and node_modules were added to your project. package-lock.json keeps track of all the versions of the dependencies you are using, and node_modules holds all the source code for those dependencies.
Once you are done with that, you’ll need to import the dependencies we want to use into your server.js file.
Add the following code under TO-DO 1:
const mongo = require('mongodb').MongoClient;
const app = require('express')();
const http = require('http').Server(app);
const io = require('socket.io')(http)
Here we’ve assigned each dependency a variable name. This makes it easy to access when we need to use it. For example, let’s pretend that express contains a function called petKitten(). We’ve assigned express the variable name app so we can say app.petKitten(); to use that function.
⭐️ TO-DO 2 ⭐️ in server.js
We have home.html and chat.html, but we need to display these at http://localhost:3000
Add the following code under TO-DO 2:
app.get('/', function(req, res){
  res.sendFile(__dirname + '/home.html');
});

app.get('/chat.html', function(req, res){
  res.sendFile(__dirname + '/chat.html');
});

http.listen(3000, function(){
  console.log('listening on *:3000');
});
The first two blocks allow us to send and HTML file to be displayed depending on the URL entered. When we are at http://localhost:3000 we will see home.html and when we are at http://localhost:3000/chat.html we will see chat.html. If you add any additional HTML pages, you will need to set them up here.
The final block configures the Port #
⭐️ TO-DO 3 ⭐️ in server.js
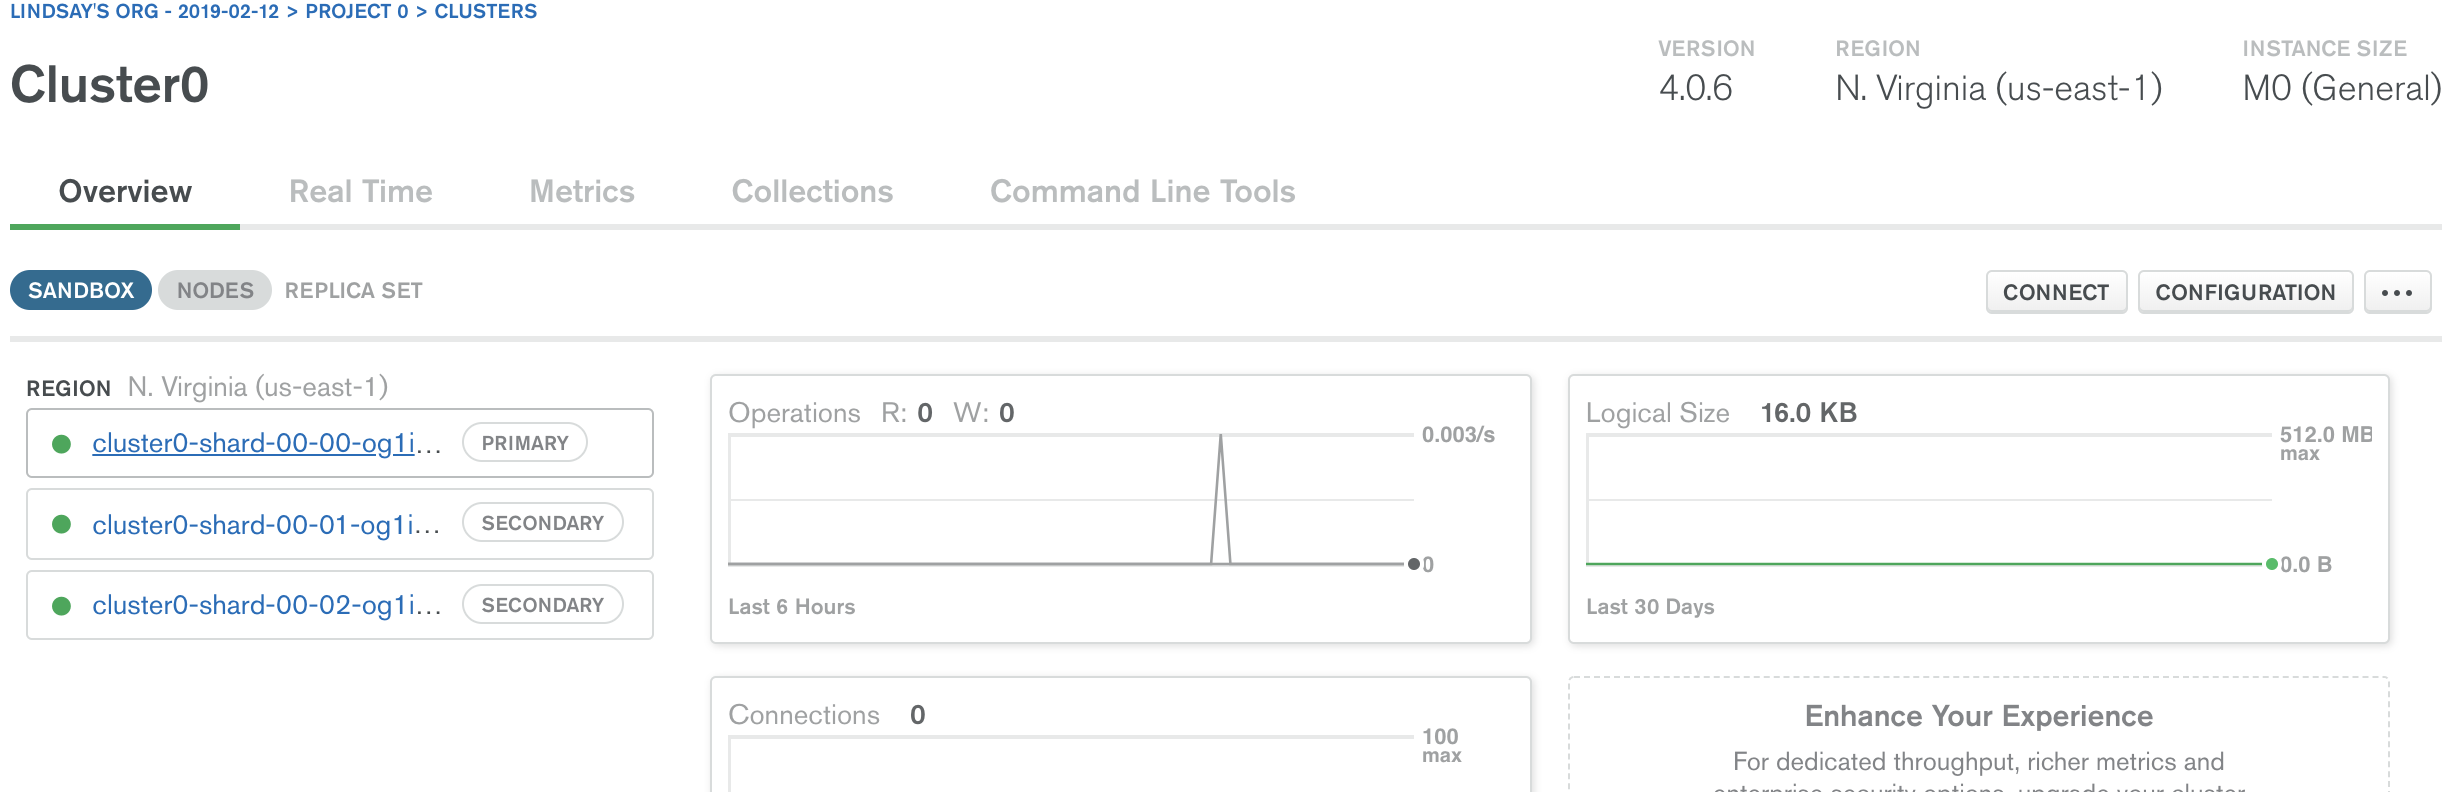
Get your Connection String from MongoDB Atlas.
You can find this by clicking on your Cluster and clicking “connect” to the right.
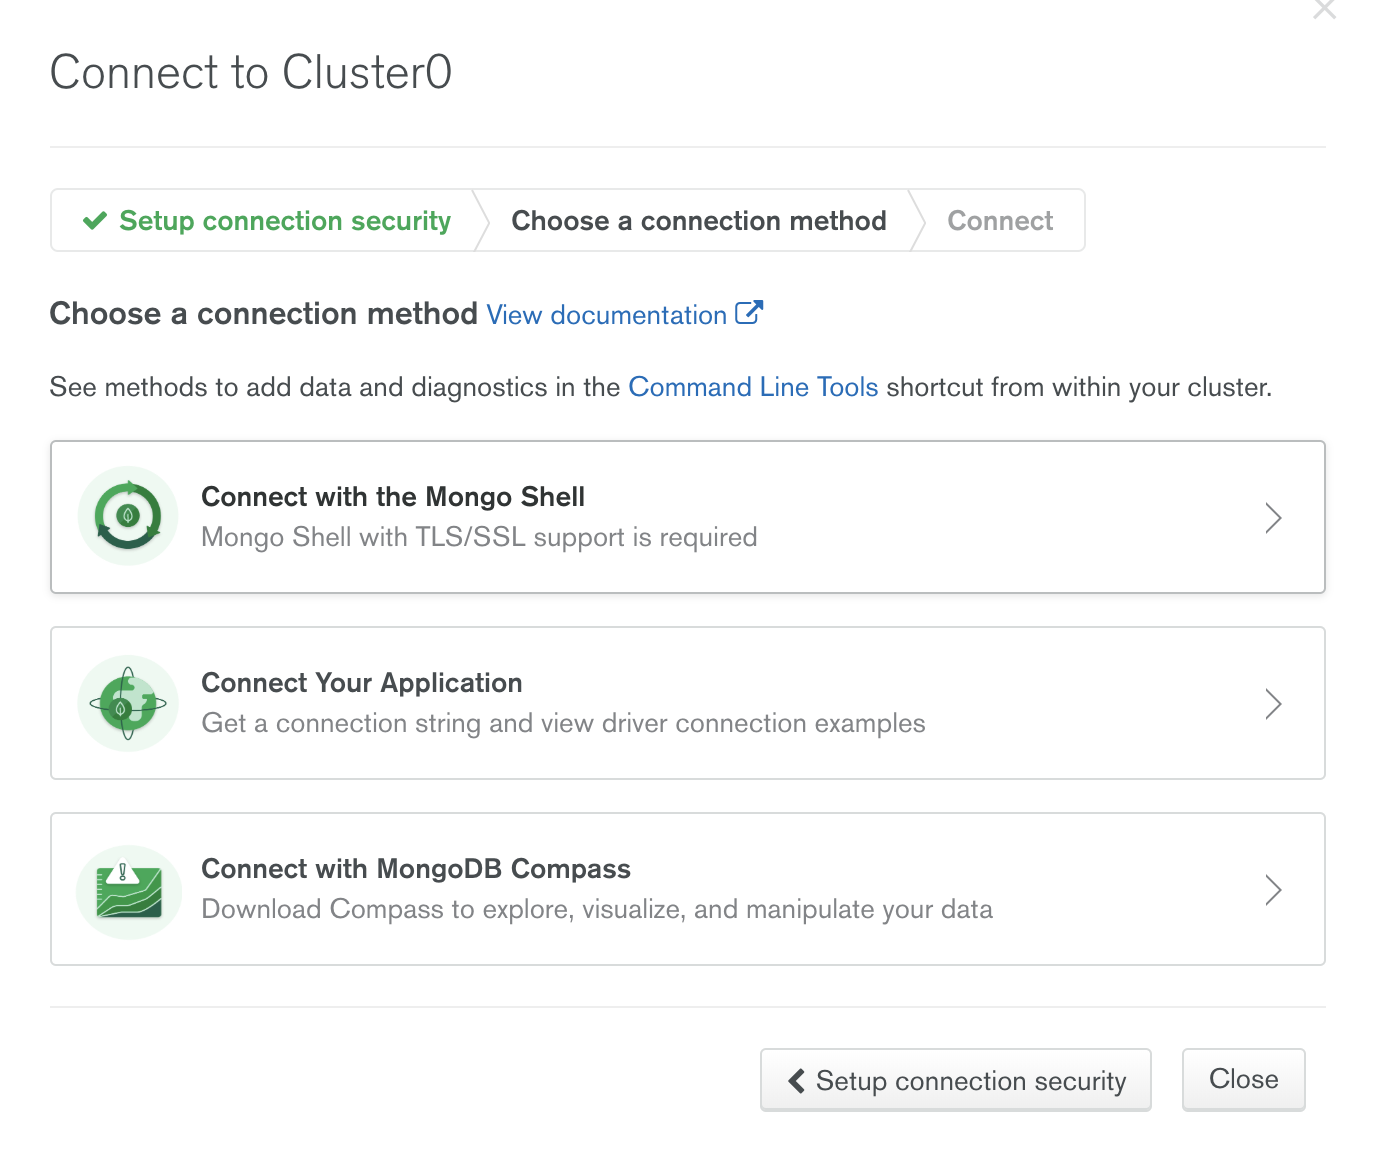
That will open this screen. Click the middle option “Connect Your Application”
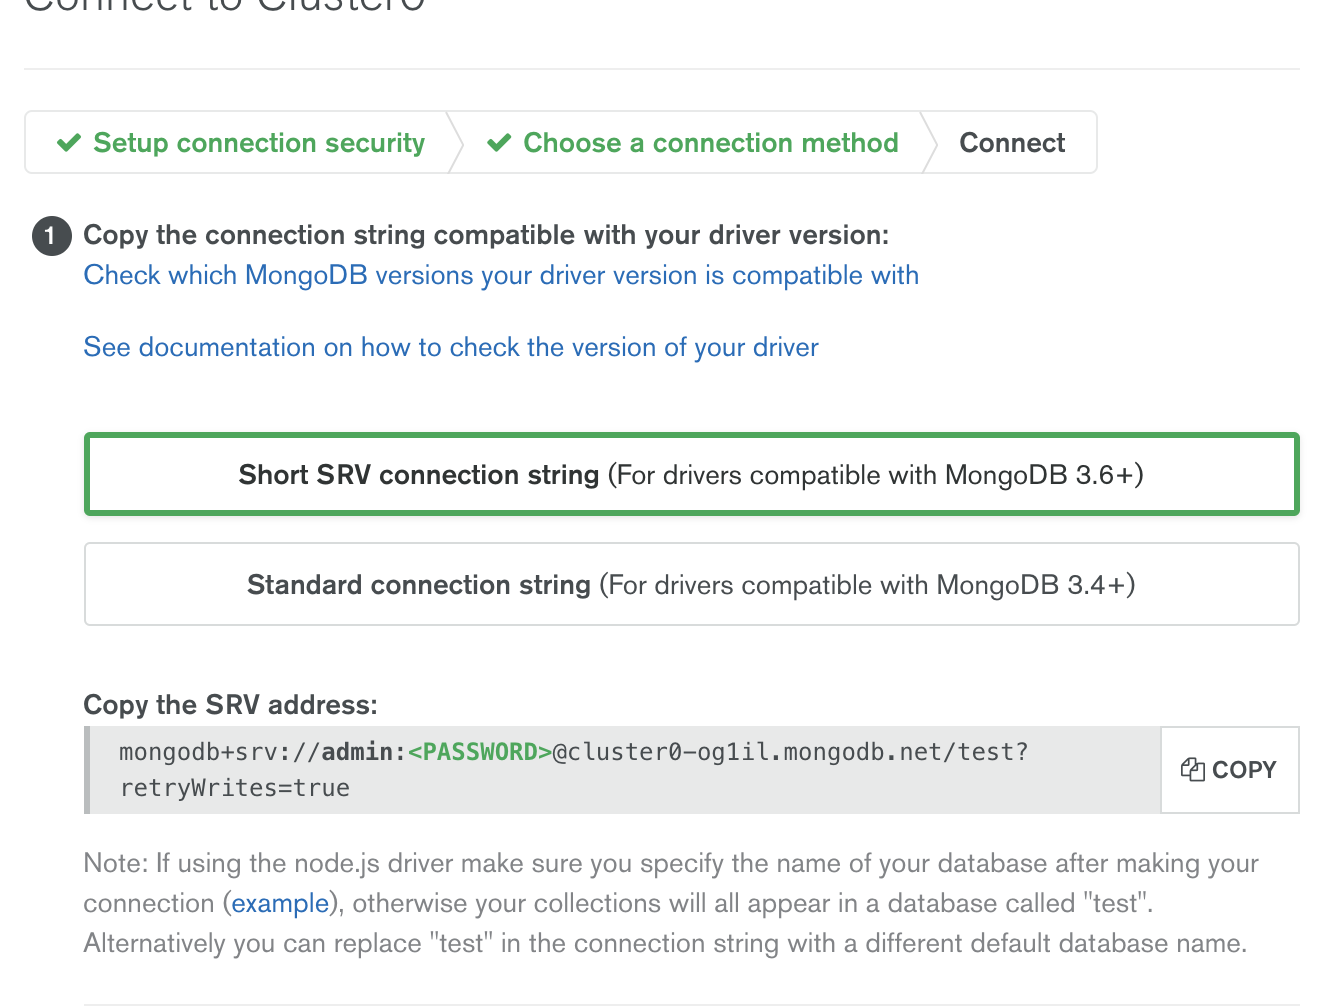
That opens this window. Click “Short SRV connection string”. Then copy an paste this string into the code.
admin here is your username– you will need to replace
Paste that string under TO-DO 3
⭐️ TO-DO 4 ⭐️ in server.js
Let’s connect to MongoDB and log a message in the terminal
You’ll see the following code mongo.connect(uri, function(err, client){ which will connect to MongoDB using the URI you wrote in the last step.
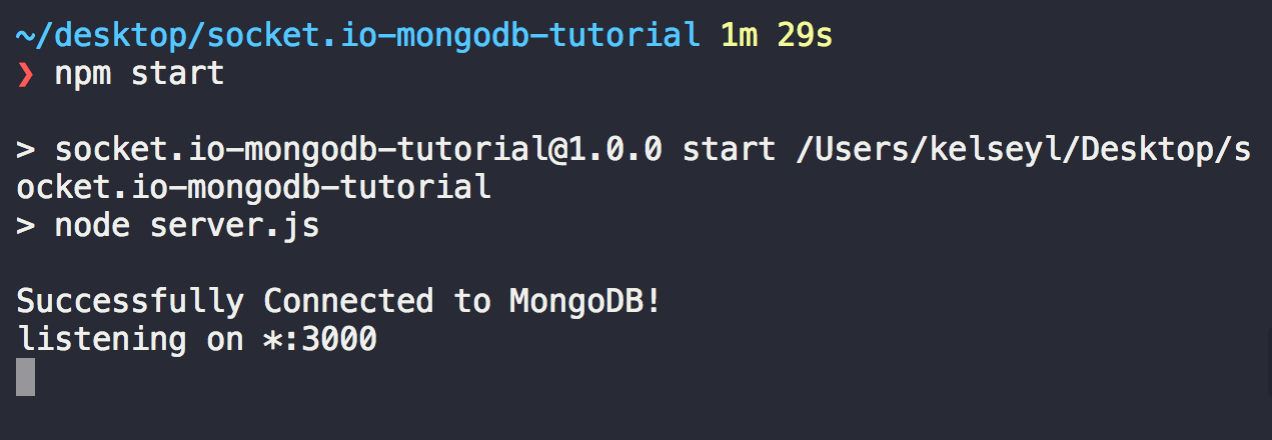
We want to know that MongoDB is successfully connected so let’s log a message to the terminal.
In the original function we passed in a parameter called err which we can use to print an error in the terminal. Inside the if(err){ } let’s log a message in the terminal if there is an err.
You can log the parameter err itself, but let’s also log a user-friendly string so it’s easier to read. Hint: you can log multiple things by separating with a comma. Example: console.log("My message", parameter)
Below the if(err){ } let’s log a string if MongoDB successfully connects.
💻 Code Check! 💻
Let’s make sure everything we’ve done so far is working.
run npm start
You should see your message logged in the terminal:
Open up http://localhost:3000/ and you should see a welcome screen. Click “enter the chat” and you will be taken to a chat page. Right now it doesn’t do anything, so let’s work on hooking it up.
⭐️ TO-DO 5 ⭐️ in chat.html
Connect to Socket.io, paste the following code in:
var socket = io();

if(socket !== undefined){
    console.log('Connected to socket...');
  }
This will create a connection and also will log a message to your browser’s console. To open the browser console, while your browser is open type option + command + i. This will open your developer tools. Click the tab called “console” and you should see the message Connected to socket...
⭐️ TO-DO 6 ⭐️ in chat.html
In the file chat.html you have been provided a basic HTML layout using Bootstrap. There are three HTML elements that have ids (username, messages, textarea). We need to access each of these three elements in JavaScript so we can manipulate them later.
For example, if I have an HTML element <div id="email">
I can assign this element to a variable like var email = document.getElementById('email');
Go ahead and do this for all three id’s (username, messages, textarea)
⭐️ TO-DO 7 ⭐️ in chat.html
Now that we have a basic chat in HTML, we need to do something with the text the user has inputted. In JavaScript, you can capture a user event, such as a key click, scroll, or mouseover by adding an event listener that will always be listening for that action to take place.
In this case, we want to do something when the user presses the enter key. Each key has a number associated with it, so we can easily know what the user has entered. Go to https://keycode.info/ and see what number the “enter” key is.
Now, let’s write an Event Listener.
I’m going to create an example using a “keydown” event that is looking for the user to press the “A” key which is key 65.
element.addEventListener('keydown', function(event){

    if(event.which === 65){
        console.log("The Key has Been Pressed!")
    }
})
Here you’ll need to replace “element” with the HTML element we are listening to for the user’s messages. Remember we made variable names out of these earlier. You’ll also need to listen for the “Enter” key rather than the “A” key.
💻 Code Check! 💻
Let’s do another check to make sure everything is working!
Run the program npm start
Open http://localhost:3000/chat.html
Open the browser’s console option + command + i
Type a message in the text box and click “Enter”, you should see a message logged every time you press enter.
⭐️ TO-DO 7 Continued ⭐️ in chat.html
Now that we have our event listener working, we need to do something if the event happens. When a user hits the enter key we want to get the values from the username and textarea elements and send them to the server.
To do this, we use socket.io
We previously created the variable var socket = io(); so we can used this to emit events from the client to the server.
socket.io uses a method called “emit” to communicate between the client and the server.
For example if I have these HTML elements:
<input id="name"></div>
<input id="text"></div>
I can send their values to the server when someEvent fires:
socket.emit('someEvent', {
    name: name.value,
    message: text.value
});
For a user input, we want socket.io to fire on the event called ‘input’, and we want to send an object that contains a “name” and a “message”. Rewrite the above code to work on ‘input’ and to get ‘name’ and ‘message’ from the correct HTML elements (remember we made variables for these!)
We want this code to only run if a user presses enter, so make sure this is inside the ‘If’ block that runs when a user clicks enter.
The last thing we need to do on the Client side is to reset the textarea box to be empty once a user presses enter. You can set the value of an element like textarea.value = "New Value" so set it to be an empty string.
⭐️ TO-DO 8 ⭐️ in server.js
Back in server.js let’s set our database so we can store the messages that our user has inputed.
Add the variables:
const db = client.db('test');
My database’s name is ‘test’. You’ll need to replace this with the name of your database.
⭐️ TO-DO 9 ⭐️ in server.js
Now let’s set a variable for our collection:
const chat = db.collection('messages');
This will allow us to access our collection called ‘messages’
⭐️ TO-DO 10 ⭐️ in server.js
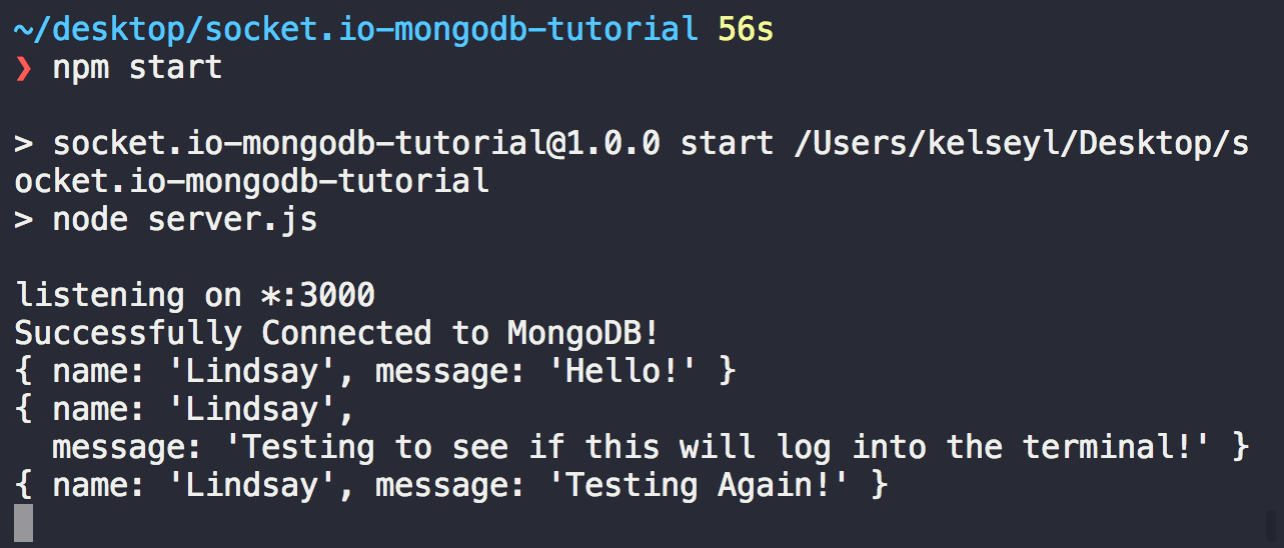
Now, we are ready to handle to user input on the server side. On the client side (web browser) we emitted data on the event ‘input’. On the server side, we need to grab the data that was sent to us on the same event.
Paste in the following code:
socket.on('input', function(data){

  console.log(data)

  //1. Insert Data into Database Collection


  });
Before we write the code for 1. and 2. let’s do a quick code check. Here on input we are taking in a parameter called data. Then, we are logging the parameter called data into our terminal.
💻 Code Check! 💻
Run the project npm start
Open http://localhost:3000/chat.html
Enter a username and message & press Enter
You should see the data object you passed from the client side printed in the terminal
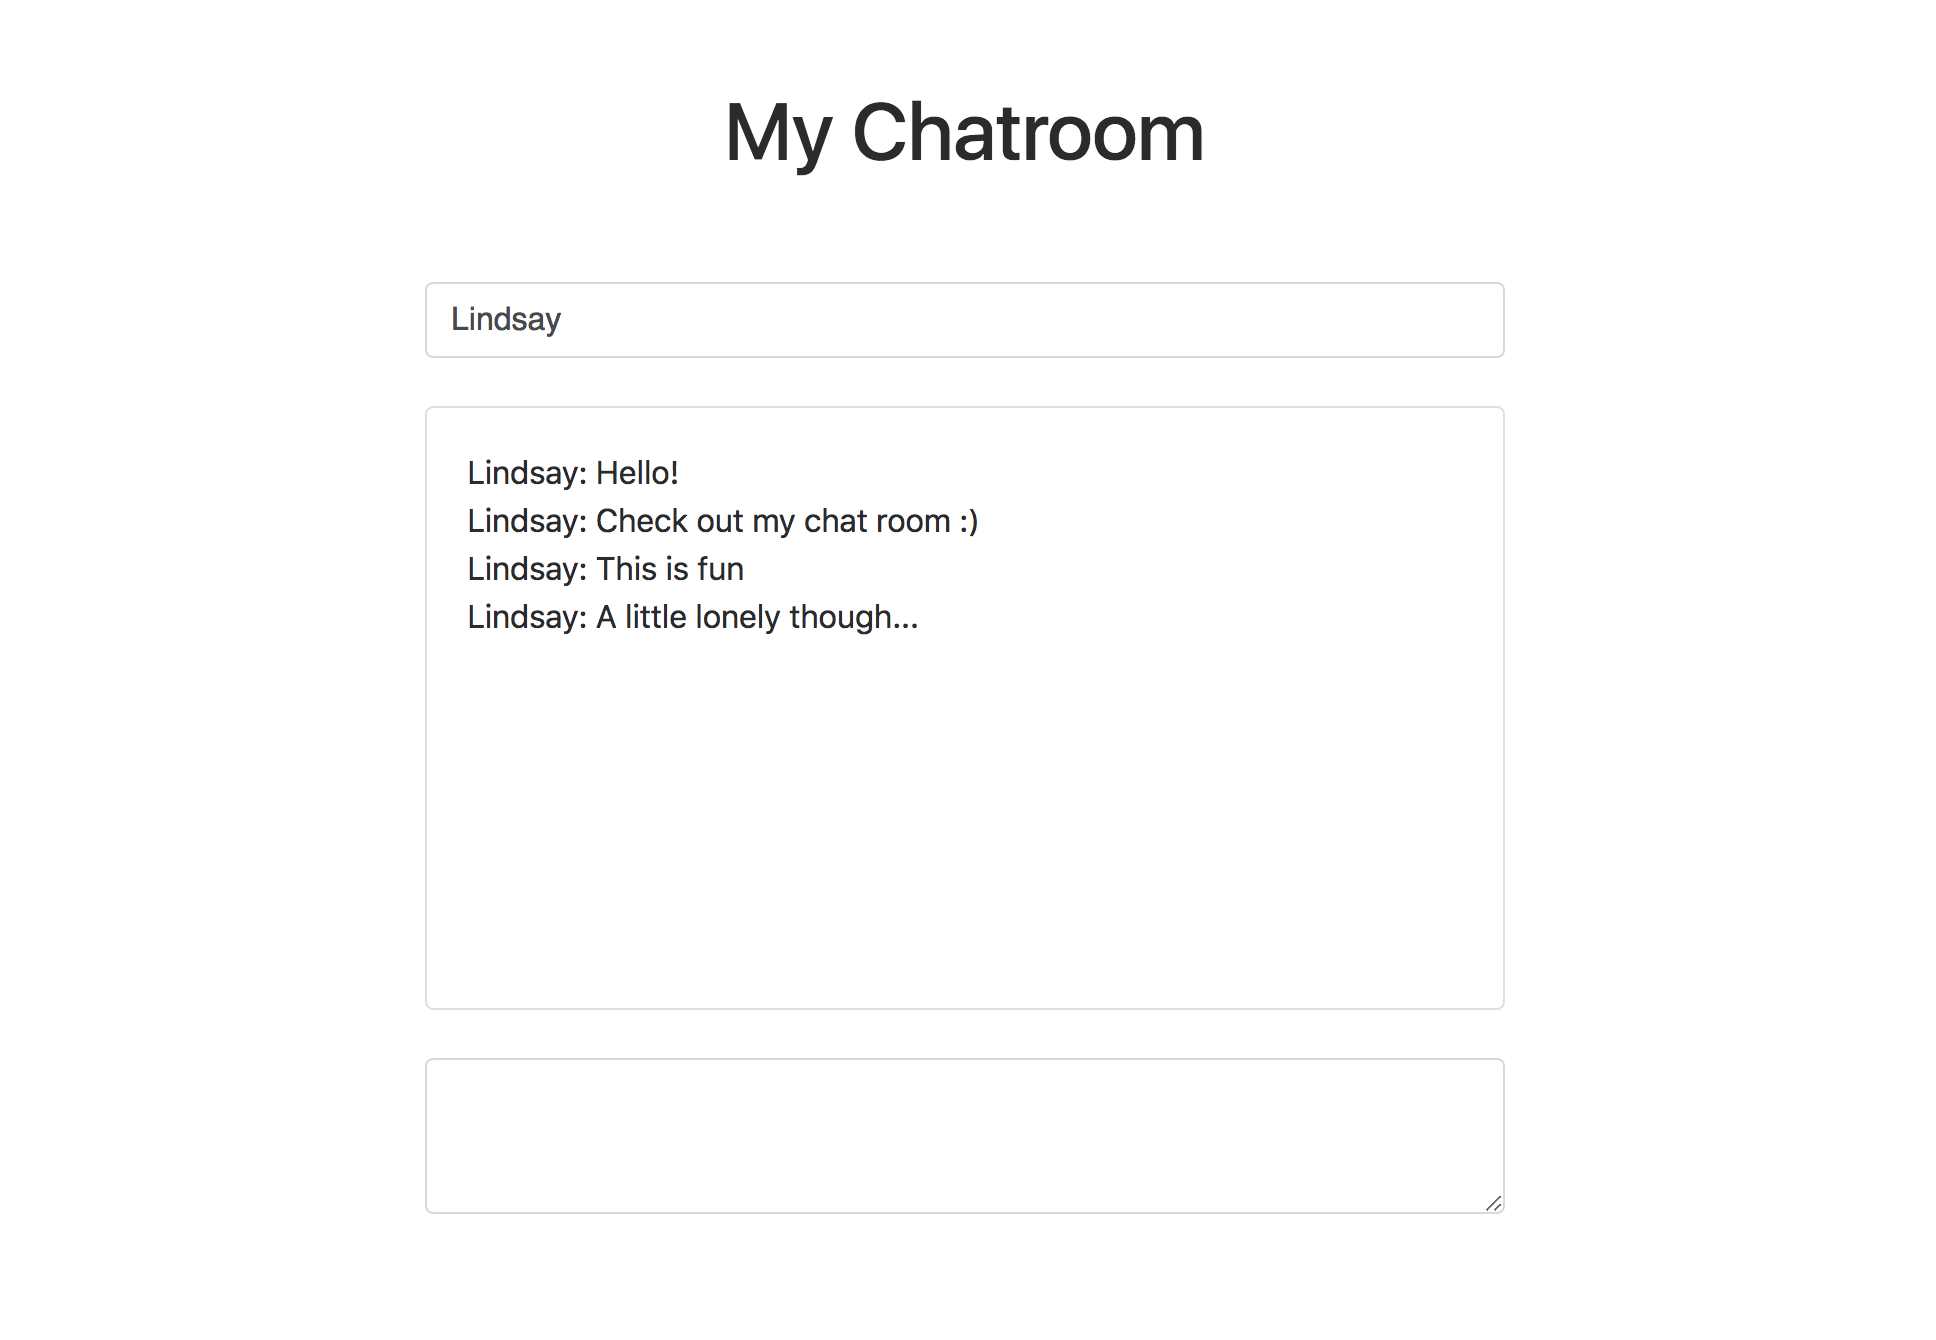
Here are 3 messages I sent:
⭐️ TO-DO 10 Continued ⭐️ in server.js
Great! Now the server is getting the data.
Now we need to write the code to put that data in the collection.
- Insert Data into Database Collection
Our data is an object called “data” that looks like this:
{ name: ‘Lindsay’, message: ‘Hello!’ }
Remember we designated the variable “chat” for our collection earlier?
We can do things like chat.find() and chat.remove(parameters) to operate on our collection. Google how to insert one document into MongoDB, and make sure you are passing the parameter “data” to it.
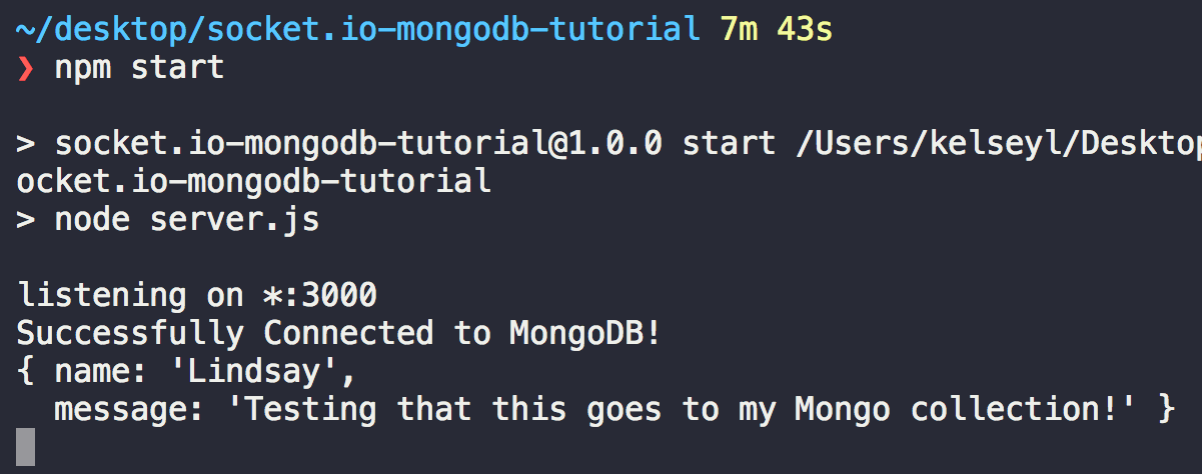
💻 Code Check! 💻
Run the project npm start
Open http://localhost:3000/chat.html
Enter a username and message & press Enter
You should see the data object you passed from the client side printed in the terminal:
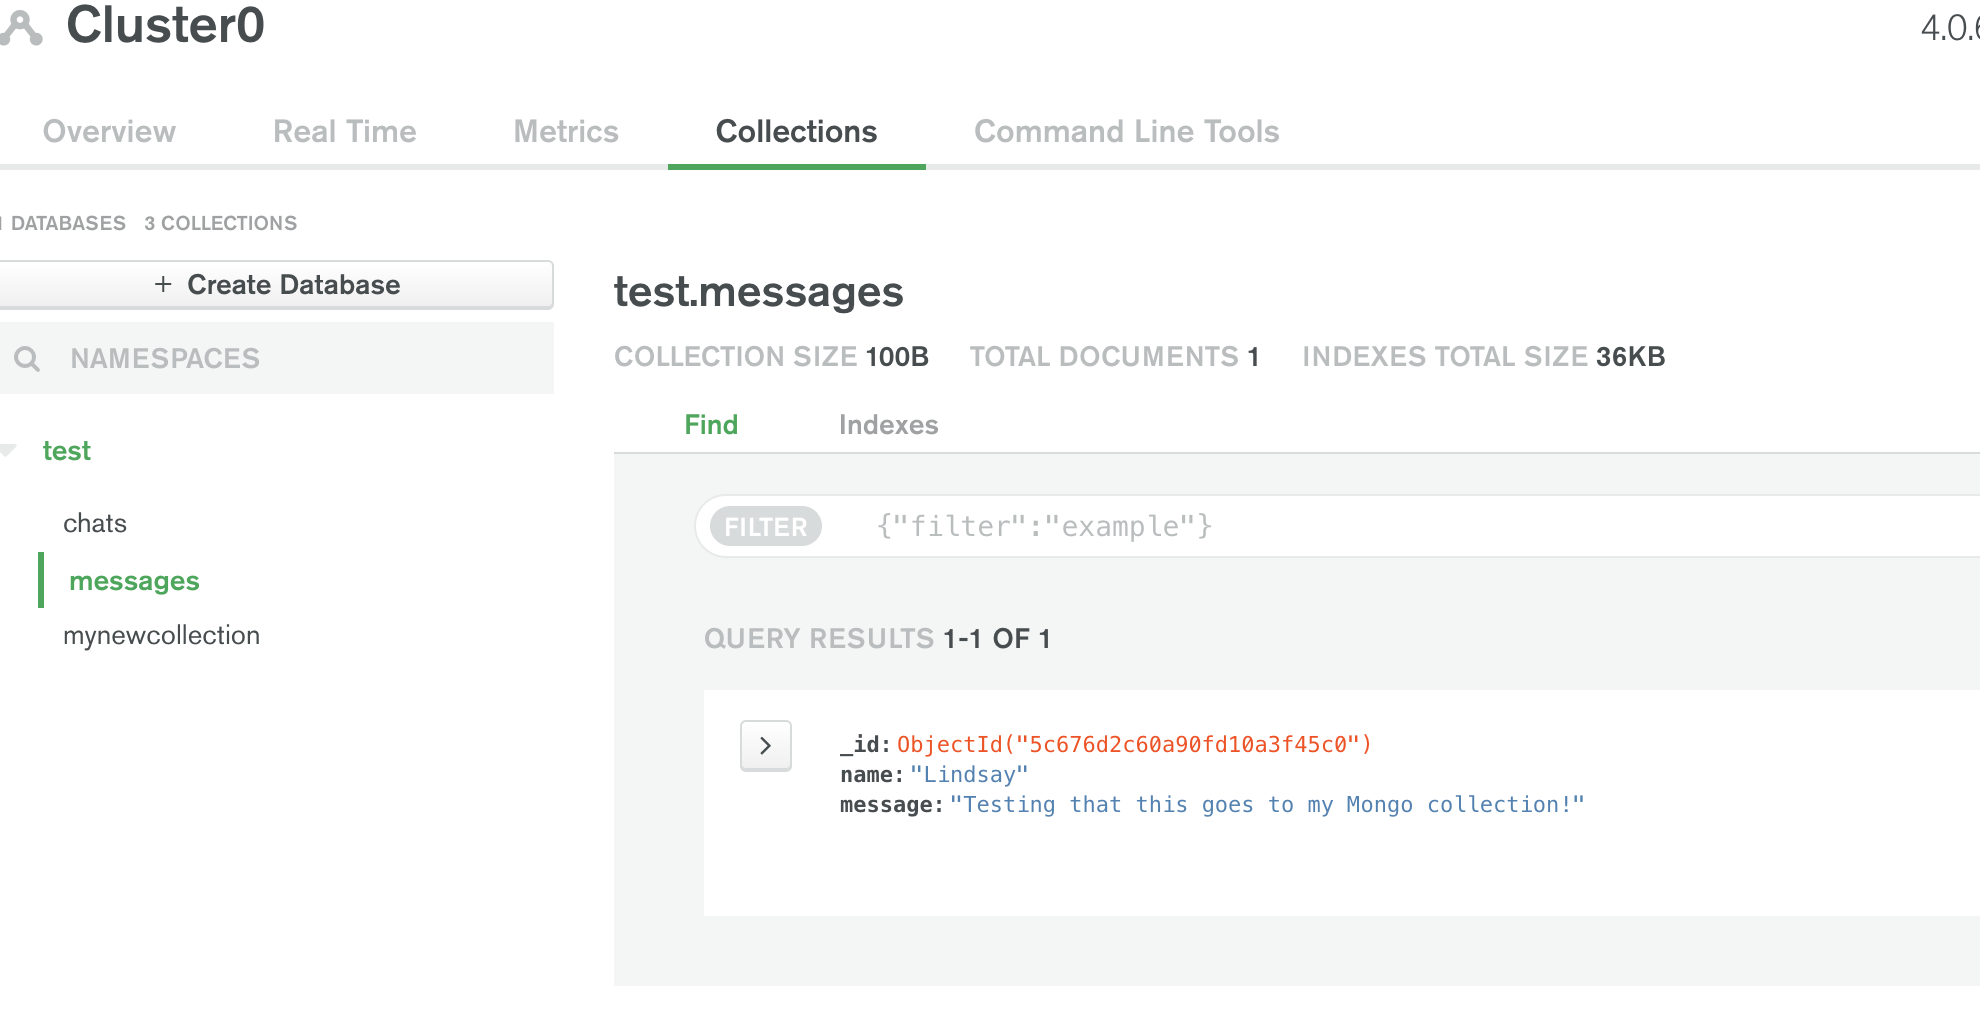
Open MongoDB Atlas and open your collection “messages”
You should see any messages you just entered now in the database:
⭐️ TO-DO 11 ⭐️ in server.js
Now that we’re saving messages, we need to get all of the messages in our collection and send them from the server to the client so that we can display them in our chat window.
Let’s paste in this code:
chat.find().toArray(function(err, messagesArray){
  console.log(messagesArray)

  if(err){
    console.log('There was an error retrieving messages \n', err)
  } else {

  // 1. Emit the messages from the server to the MongoClient

  }
});
This will find everything in the collection “chat” and turn it into an array so we can easily loop through it on the client side in the next step.
If there is an error, we will log it into the console.
Else, we want to emit our messagesArray from the server to the client.
Remember, when we emitted out input we did socket.emit('input', data)
In this case, we need to emit our messagesArray on the even ‘output’
⭐️ TO-DO 12 ⭐️ in chat.html
Let’s access the output on the client-side. Paste in this code:
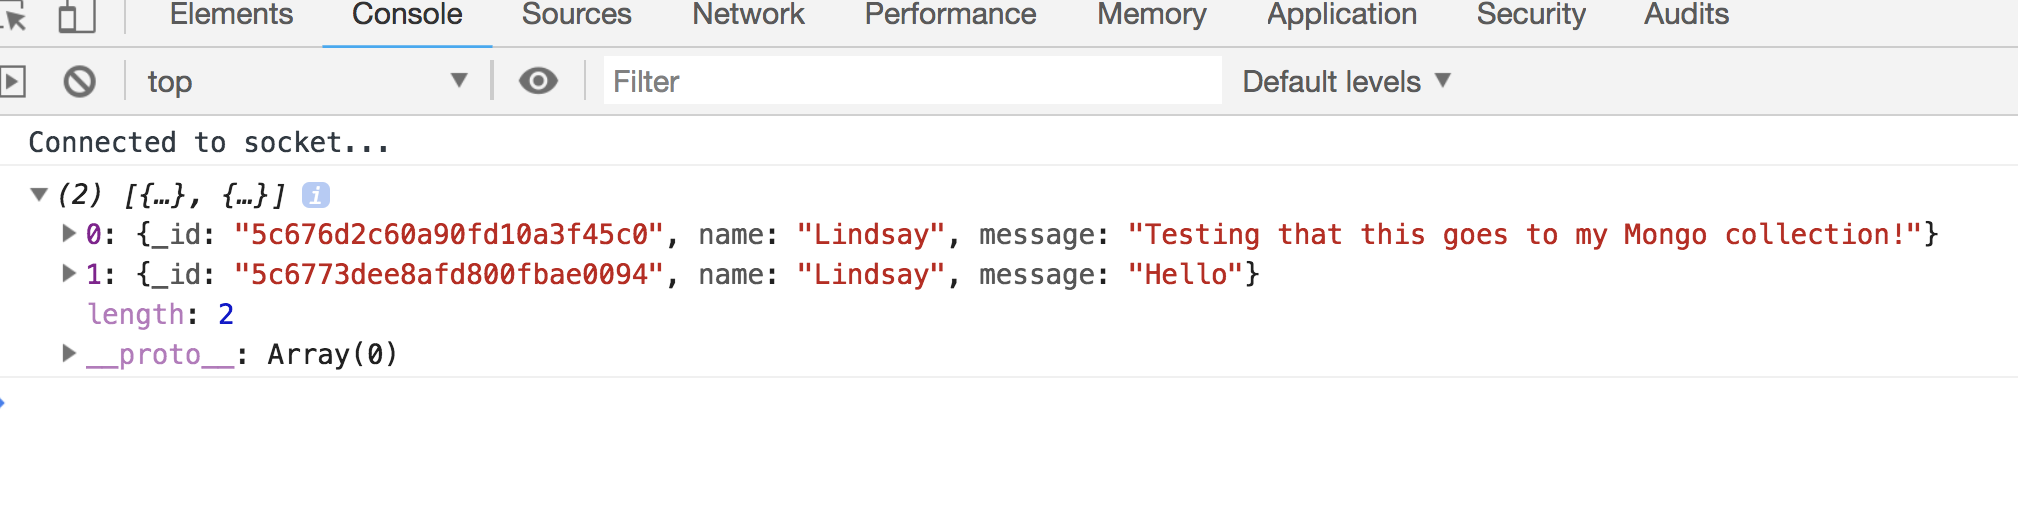
socket.on('output', function(messagesArray){
    console.log(messagesArray);

    //1. Loop through each item in the Array

});
This will print the messagesArray into your browser console.
💻 Code Check! 💻
Run the project npm start
Open http://localhost:3000/chat.html
Open the browser’s console option + command + i
You should see a log of all the data that is in your messagesArray:
⭐️ TO-DO 12 Continued ⭐️ in chat.html
Now we need to loop through each item in our messagesArray and add a div that contains our messages. First, write a for-loop.
Then, inside the for-loop:
-
Create a new div
var message = document.createElement('div'); -
Assign the textContent of our new div to show the name and message
message.textContext = <NAME> + ": " <MESSAGE>;You will need to replaceand with the name and message that is located at the index of messagesArray that we are currently on. Hint: `messagesArray[0].name` will give you the first name at index 0. -
Append the message to the to the element with id “messages”
messages.appendChild(message);
💻 Code Check! 💻
Run the project npm start
Open http://localhost:3000/chat.html
You should now see new messages appear in the chat window after you enter them!
🎉 Phew, You’re all done! Super impressive work to make it this far 🎉
If you’re looking for a few more challenges, I’ve included some Bonus Missions. No worries if you don’t get to these.
🚀 Bonus Missions 🚀
-
Normally when you are typing, if you press shift + enter you will go to a new line, rather than submitting what you have typed in the input box. How can you check if the shift key is already being pressed when then enter key is pressed?
-
Did you notice when the chat box gets full that it stays scrolled to the top when you open a the app for the first time? How can you get the scroll bar to be fixed to the bottom to show the latest message? Alternately, you could make the latest message appear at the top in reverse order.
-
If a user doesn’t enter a name, data will be sent to MongoDB with an empty user. How can we prevent a user from entering a message if the name field is empty?
-
What if there are a lot of old messages in our database? How many messages do we want to display for the user? Let’s say we want to only show the most recent 100 messages. How would we do that?
✨ Next Steps ✨
Now that you have a basic app, what’s next?
Well, that’s up to you.
Ideas:
Add some styling and colors to make the app look prettier. Don’t forget to check out the Bootstrap documentation!
Add a list of users alongside the chat so everyone knows who has access to that chatroom.
Display status messages like “Message Sent!” or “Please enter a username!” so the user knows when an action was successful or unsuccessful.